The plug-outs are the external programs written in C++ or Java interacting with BOUML, these programs may be written using BOUML itself. The previous chapter describe some plug-out including the code generators and code reverse.
A plug-out is a very practical way to automatize treatment on the model, do not hesitate to write plug-out. I just recommend you to save your model before executing your plug-outs when you debug them :-) !
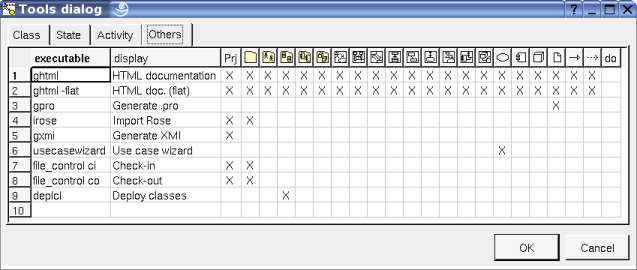
To be executed, a plug-out must be declared through the tool dialog called when you select the tools settings entry of the tools menu :
The first column specify how the plug-out is executed, for a C++ program you just have to give its name and may be the path depending on your environment, in Java the -cp option allows to specify the path and the starting class is Main (except if you change the definition of the executable artifact !).
The content of the second column will be displayed in the menu when your plug-out is applicable on the target item.
The other columns allows to specify the kind of the items on whose the plug-out is applicable. For instance below, gpro may only be applied on a artifact.
Note that the declaration of the plug-out is saved in the file named tools, this allows you to quickly set the tools list after creating a new project copying the tools file of an old project (this file is read when you load the project).
The distribution of BOUML contains a project named empty, this one is a plug-out doing nothing for you point of view, in fact it implements in C++ and Java the API allowing to interact with BOUML. To develop a new plug-out open the empty project, BOUML will ask you to save it in an other project to keep empty unmodified. You may also develop a plug-out from one of the others available plug-outs, you just have to know that these ones was developed at different step of the BOUML definition, then they do not contain all the BOUML API and some operations may not be defined. By definition, empty contains all the API.
The empty plug-out contains several already defined classes with their associated artifact, half of them are placed under the package API BASE and implement the API with BOUML, you cannot modify them, they define the system part of a plus-out. The other half is yours, each of these user classes inherits to a system class, and sometimes a system class inherits of a user class, for instance the classes associated to ... the classes are:
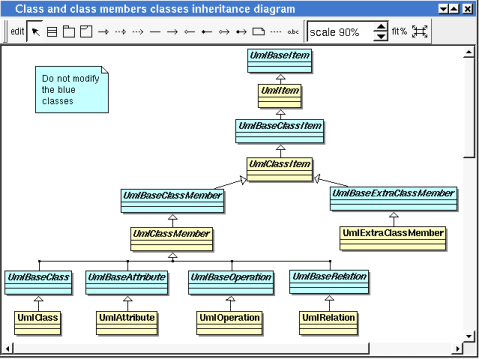
In this diagram the blue classes are the system classes, the other classes are yours. UmlItem is the user class inherited by almost all the other classes.
The disadvantage of this choice in C++ is to recompile many files when a base class is modified, but this allows to define (virtual) operations managing several classes.
I do not describe in this documentation all the predefined classes and their operations, the better is to look at the model of a newly created plug-out or to generate the html pages describing it (this is done under the empty_html directory, the html entry page is index-withframe.html). I also recommend you to look at the plug-outs given with the BOUML distribution. Nevertheless you have to know :
the entry point of a plug-out in C++ and Java is placed in the artifact named Main under USER API, refer to it
if the C++ pre-processor variables WITHCPP, WITHJAVA, WITHPHP and WITHIDL are defined (using #define or -D option of the G++ compiler, etc ...) you will get all the informations from BOUML.
if the C++ pre-processor variables WITHCPP, WITHJAVA, WITHPHP and WITHIDL are not defined you will access only to UML data, this means for instance that the operations cppDecl javaDecl phpDecl and idlDecl will not be defined for UmlBaseClassItem, this limits the amount of data managed by a plug-out and reduce the execution time and used memory space
if only WITHCPP is defined you will access only to UML and C++ data, this means for instance that the operations javaDecl phpDecl and idlDecl will not be defined for UmlBaseClassItem, this limits the amount of data managed by a plug-out and reduce the execution time and used memory space
if only WITHJAVA is defined you will access only to UML and Java data, this means for instance that the operations cppDecl phpDecl and idlDecl will not be defined for UmlBaseClassItem, this limits the amount of data managed by a plug-out and reduce the execution time and used memory space
if only WITHPHP is defined you will access only to UML and Php data, this means for instance that the operations cppDecl javaDecl and idlDecl will not be defined for UmlBaseClassItem, this limits the amount of data managed by a plug-out and reduce the execution time and used memory space
if only WITHIDL is defined you will access only to UML and IDL data, this means for instance that the operations cppDecl javaDecl and phpDecl will not be defined for UmlBaseClassItem, this limits the amount of data managed by a plug-out and reduce the execution time and used memory space
the other combinations where only two of these three pre-processor variables are defined are illegal.
See upgrade plug-out.
![]()
It is possible to apply a plug-out on the project when Bouml is started through your shell or command line :
bouml <project file> -exec <plug out> <plug out options> -exit
<project file> indicates the model to load as usual.
<plug out> indicates the plug-out to apply on the project. The C++ generator is named cpp_generator, the Java generator java_generator, the Php generator php_generator, the Idl generator idl_generator, the HTML generator ghtml, the XMI generator gxmi and gxmi2. If necessary the full path of the plug-out have to be done, warning : under Windows this path must not contain space.
<plug out options> are the optional options you give to the plug out
-exit is optional and allows to exit from Bouml when the plug-out execution is done.
For instance (HTML generator options are given here, XMI generator options are given here) :
"C:\Program Files\Bouml\bouml" "D:\...\aze\aze.prj" -exec C:\Progra~1\Bouml\gxmi -uml c:\aze.xmi windows-1252 -exit
bouml .../qsd/qsd.prj -exec -flat /usr/lib/bouml/ghtml /tmp/qsd_html -del_html -exit
![]()
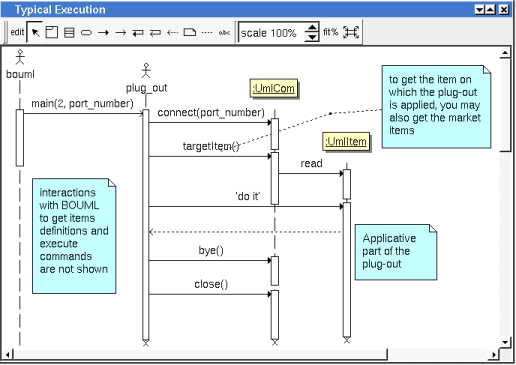
The exchanges between BOUML and the plug-outs are supported by a TCP/IP socket. When you ask BOUML to start a plug-out, it search for a free port number starting at 1024. In case you have a firewall it may be necessary to configure it.
To reduce the number of exchanges with BOUML and run faster, a plug-out does not ask for BOUML each time you want to get a value. The system classes read and memorize all the data of a given item the first time you access to one of them (with the restrictions allowed by WITHCPP, WITHJAVA, WITHPHP and WITHIDL). This is transparent for you until two plug-outs access to the same data, when one plug-out modify a value already read by the other, the second plug-out does not see the new value until it unload (an operation defined on UmlBaseItem) the object, then ask for the value.
![]()
A user property is a couple key – value, the value may be empty.
By default the user properties are not used, nevertheless they exist! It is the only way to add information concerning any item (without modifying BOUML !), and obviously they are accessible in the plug-outs. The alone limitation is that the keys and the values must contain string, may be on several lines ... even the editor called by the dialogs is not a multi-lines editor !
The plug-out genpro use the properties of the artifact on which it is applied to save its data and give them is a future usage (supposing the project saved !).
To see/modify them, select the last tab named User present in the dialog of any kind of item.
![]()
To compile the java files, go in the directory where the files are and do javac *.java (don't compile file by file because some files associated to the API contain several classes).
![]()
Qt 2.3 for Windows and Microsoft Visual C++ is available here : ftp://ftp.trolltech.com/qt/non-commercial/
Because this release of Qt is old, if you install Qt on a recent release of Windows (for instance Xp) the installation may be frozen at the end, in this case just kill the installation process and in fact the installation is done.
Read the Qt documents to see how to use Qt under Microsoft Visual C++.
On recent releases of Windows / Visual C++ the macros allowing to automatically create a Qt project and / or to ask for the usage of moc on header files may not work, in this case read the following
To have a QT project
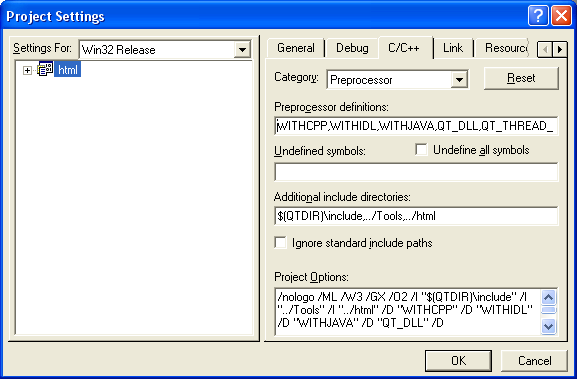
Edit project settings :
the MFC must not be used :

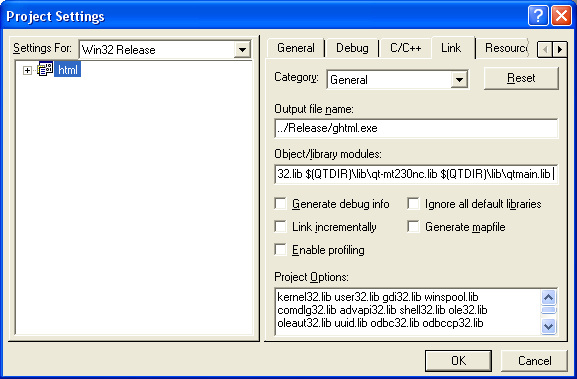
add the preprocessor definitions WITHCPP WITHJAVA WITHPHP WITHIDL QT_DLL QT_THREAD_SUPPORT (having both WITHCPP WITHJAVA WITHPHP and WITHIDL is not mandatory, you may define only one of them, for instance WITHJAVA in case you are only interested by the Java definition of the items, this allows to save memory space at the execution), add the additional include directory $(QTDIR)\include :
add the library modules $(QTDIR)\lib\qt-mt230nc.lib and $(QTDIR)\lib\qtmain.lib :
To apply moc on a header
Edit the settings of the file in the following order :
use custom build step:
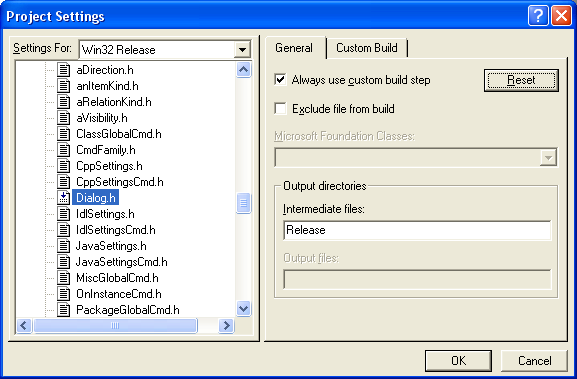
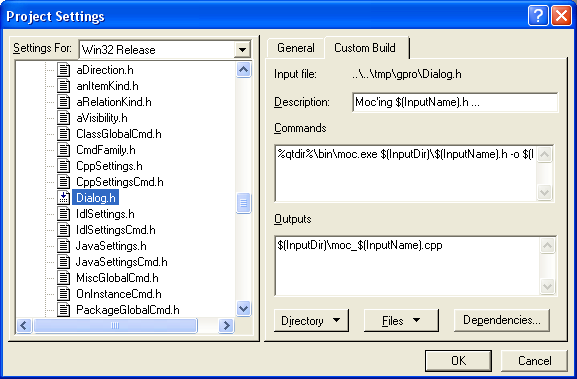
set Output to $(InputDir)\moc_$(InputName).cpp
set Commands to %qtdir%\bin\moc.exe $(InputDir)\$(InputName).h -o $(InputDir)\moc_$(InputName).cpp
set Description to Moc'ing $(InputName).h
![]()
Previous : Use case wizard
Next : Project control