Figure 1Ā- Diagram "object hierarchy"
You'll find in this section an introduction to PyReverse followed by a description of the download and installation procedure.
currently PyReverse build a representation of the source tree with:
PyReverse provides modules which use this representation for:
Notice that the representation of the project files is a classes hierarchy that can be used to do many others things than generate UML diagrams.
To use the PyReverse package, you need to install PyXML, Optik and Logilab's common library.
The PyReverse package itself can be downloaded from the Logilab ftp site.
Optionally, you may want to try the Argo UML modeler to get nice UML diagrams. We are using release 0.10.1 of Argo UML. We recommend to use a version of Argo UML greater than 0.9 since older versions don't implement algorithms to automatically layout objects of the diagram (pyargo only generate a minimal PGML file without placing objects)
If you are using pyargo to generate diagrams for a big project, it's recommended to install 4Suite 0.12. If 4Suite is available, the 4Suite C Domlette implementation will be used instead of minidom, and so the program'll run faster and consume less memory.
The main advantage of pyargo is to produce diagram editable in an UML tool. If you just want to see what an object hierarchy looks like without editing the diagrams latter, you should download and install VCG. Both pyvcg and VCG are much more light-weight tools than pyargo and Argo UML.
To install the package if you have downloaded the tarball version, just unpack the tarball and run python setup.py install. In the others cases follow the usual procedure of your package management system or instructions of the Windows installer.
This will install the libraries and five executable scripts : pyargo (Section 4 “PyArgo”Ā- Chapter III), pyvcg (Section 5 “PyVcg”Ā- Chapter III), py2tests (Section 6 “Py2tests”Ā- Chapter III), and py2xmi (Section 7 “Py2xmi”Ā- Chapter III).
Please send any comment, patch or question to the xml-logilab mailing-list.
You'll find here some generality usefull to control the generation of your UML diagram from a Python project. You should read this before the sections about pyargo and pyvcg.
A diagrams definition file is an XML file which permits to control UML diagrams generation with pyargo and pyvcg. If you don't give a diagrams definitions file to pyargo or pyvcg, a default representation 'll be generated with two diagrams: one with all the classes of your project and another with each package (if there is more than one package).
See the DTD in the "dtd" directory of the distribution for a description of all available constructs.
Well, a little example is still the best way to a quick understanding... Let's see how to generate useful diagrams for the following code:
First, we have to write the diagrams definitions file, which enumerates for each diagram we want to obtain the classes and packages of the project it should contains. Here is simple definition which takes care to give a good overview:
You should follow the following tips if you want the PyReverse command line tools to work correctly...
In order to be able to resolve imports correctly, you have to place yourself in
the correct directory, the root of the package directory. For instance,
to document the package "pyreverse" in the Python site packages
directory, you have to type:
cd ~/lib/python2.1/site-packages/
pyargo -p PyReverse pyreverse
See Section 2 “Common options”Ā- Chapter III for a description of options available in most PyReverse command line tools.
This section describes the options common to most of the programs described below.
Give a name to your project, which will be the root node of the tree describing the Python source code.
This options permits to filter the nodes according to their visibility. The following modes are available:
Considers only attributes defined in the __init__ method.
This options permits to ignore some given Python files or all files which are in a given directory. For example, if you are generating test for package X with all tests in a X/tests directory, you don't want to generate test for files which live in the "tests" directory. You can do that by including --ignore tests in your command line options. This option could be repeated multiple times.
You can put any of the options listed above in the file ".pyreverserc" in your home directory. Each tool'll try to read this configuration file on launch.
For instance, imagine you have a standard package hierarchy where you put all documentation in a "doc" directory and all tests in a "test" directory. Moreover, you usually want to see only the public attributes/methods in your diagrams. You can give this behaviour to all PyReverse tools by putting --filter-mode=PUB_ONLY --ignore doc --ignore test in your ".pyreverserc" file.
pyargo is a tool which generates diagrams for Argo UML from the Python code. It uses a diagram definitions file to generate diagrams with the appropriate classes or/and packages. If you don't give a diagrams definitions file to pyargo and then you open the project file (.argo or .zargo according to your Argo UML version) with Argo UML, you will have all your classes (XMI side) and the default diagrams : one with all the classes of your project and another with each package (if there is more than one package).
To run pyargo on your project, use pyargo -d diadefs.xml *.py or pyargo -d diadefs.xml project_dir/.
pyargo -h display the list of all the available options.
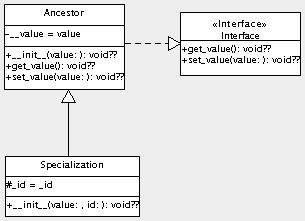
For example, using the diagrams definition seen in the previous section, we can launch pyargo with pyargo -p "Test PyArgo" -z -d diadefs.xml suppliermodule.py clientmodule.py (this supposed we saved the diagrams definitions in "diadefs.xml"). With the -z option, pyargo zip all the generated files in a zargo file, used by Argo UML > 0.9.
You only have now to open the project file with Argo UML (the file which ends with .argo or .zargo according to your Argo UML version). Since pyargo generates only minimal PGML files, the first time you will open a diagram you'll see a heap of boxes. With a recent version of Argo UML, you can use the automatic layout to dispatch the boxes on the workspace. After moving a few arrows, we obtain the following diagrams:
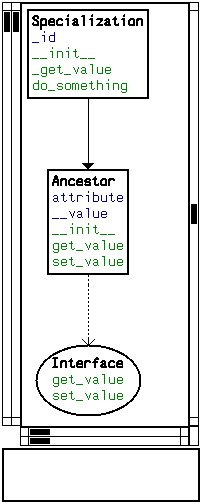
pyvcg will generate class diagrams readable by VCG. A vcg file 'll be generated for each diagram, which can be displayed using xvcg.
pyvcg shgoud be used it in the same way as pyargo. If you follow the same steps as for pyargo, you'll obtain the following diagram (package diagram are not yet supported):
As you can see, this is not really UML but enough similar to be understandable. Attributes appear in blue, methods in green. Interfaces have an ellipse shape and signals (exceptions) appear in red.py2tests is a tool to generate unit test skeleton from source code, using the unittest module from the Python standard library. I hope this functionnality will evolve soon to do the most annoying part of the job. Comments and ideas are welcome !
For the moment, here is what'll be generated: it will generate one test file for each module. A test class is generated for each class
Moreover a standard function to run tests from the command line is available (look at the file runtests.py in the PyReverse test directory)
If we want to generate unittest for the previous example in a "test" subdirectory, we just have to type py2test --test-dir test *.py
py2xmi is a subset of pyargo since it will generate a file conforming to the XMI-UML DTD for a given package.
To run py2xmi on your project, use py2xmi *.py or py2xmi project_dir/, it will print the correspondant XMI file to the standard output.
py2xmi -h display the list of all the available options.