Notebooks
The NoteBook Widget is a collection of "pages" that overlap each other, each page contains different information with only one page visible at a time. The pages can be switched between using tab labels along one edge. This widget has become more common lately in GUI programming, and it is a good way to show blocks of similar information that warrant separation in their display.
The first method you will need to know, as you can probably guess, is the constructor used to create a new notebook widget:
Notebook();The first one we will look at is how to position the page indicators. These page indicators or 'tabs' as they are referred to, can be positioned in four ways: top, bottom, left, or right:
void
set_tab_pos(Gtk::PositionType pos);- POS_LEFT
- POS_RIGHT
- POS_TOP (the default)
- POS_BOTTOM
Next we will look at how to add
pages to the notebook. There are three
ways to add pages to the NoteBook - append, prepend and insert. Let's
look at the first two together as they are quite similar.
void
append_page(Gtk::Widget& child, Gtk::Widget *tab_label = 0,
Gtk::Widget *menu_label = 0);


void
append_page(Gtk::Widget&
child, const String& tab_label, const String& menu_label = 0);


void
prepend_page(Gtk::Widget&
child, Gtk::Widget *tab_label = 0, Gtk::Widget *menu_label = 0);


void
prepend_page(Gtk::Widget&
child, const String& tab_label, const String& menu_label = 0);
There are two overloaded versions of each method. These methods add pages to the notebook by inserting them from the back of the notebook (append), or the front of the notebook (prepend). The 'child' argument is the widget that is placed within the notebook page, 'tab_label' is the label for the page being added and 'menu_label' is the label to use for the page-switch menu, if that is enabled. The child widget must be created separately, and is typically a set of options setup within one of the other container widgets, such as a table.
In the first append and prepend page methods 'tab_label' and 'menu_label' are pointers to the widgets that are to be used as the page and page-switch menu labels. The second append and prepend page methods create these widgets for you and sets 'tab_label' and 'menu_label' as the label text.
The final method for adding a page to the notebook contains all of the properties of the previous two, but it allows you to specify what position you want the page to be in the notebook:
void
insert_page(Gtk::Widget& child, int
position, Gtk::Widget *tab_label = 0, Gtk::Widget *menu_label = 0);


void insert_page(Gtk::Widget& child, int
position, const String& tab_label, const String& menu_label =
0);
The arguments are the same as the append and prepend page methods except there is an extra argument, position. This argument is used to specify what place this page will be inserted into, the first page having position zero.
Now that we know how to add a page, lets see how we can remove a page from the notebook:
void
remove_page(int page_num);
This method takes the page specified by 'page_num' and removes it from the widget.
To find out what the current page is in a notebook use the following method:
int
get_current_page() const;
These next two methods are simple calls to move the current notebook page forward or backward:
void
next_page();


void prev_page();
Simply call the respective method for the notebook widget you wish to operate on. Note, when the NoteBook is currently on the last page, and next_page() is called, the notebook will wrap back to the first page. Likewise, if the NoteBook is on the first page, and prev_page() is called, the notebook will wrap to the last page.
This next method sets the 'active' page. If you wish the notebook to be opened to page 5 for example, you would use this method. Without using this method the notebook defaults to the first page.
void
set_current_page(int page_num);
The next two methods add or remove the notebook page border and the notebook tabs respectively.
void
set_show_border(bool show_border);


void set_show_tabs(bool show_tabs);
The next method is useful when the you have a large number of pages, and the tabs don't fit on the page. It allows the tabs to be scrolled through using two arrow buttons.
void
set_scrollable(bool scrollable);
Notebook Example
Let's take a look at an example. This small program creates a window with a notebook and six buttons. The notebook contains 11 pages, added in three different ways, appended, inserted, and prepended. The buttons allow you rotate the tab positions, add/remove the tabs and border, remove a page, change pages in both a forward and backward manner, and exit the program.The header file for the Notebook example is
<notebook.hh>:
#include <xfc/main.hh>

#include <xfc/gtk/notebook.hh>

#include <xfc/gtk/window.hh>


using namespace Xfc;


class Notebook : public Gtk::Notebook

{

public:

    Notebook();

    virtual ~Notebook();


    void on_rotate_book();

    void
on_tabsborder_book();

    void on_remove_book();

};


class NotebookWindow : public Gtk::Window

{

public:

    NotebookWindow();

    virtual
~NotebookWindow();

};
and the source file is <notebook.cc>:
#include "notebook.hh"

#include <xfc/gtk/checkbutton.hh>

#include <xfc/gtk/frame.hh>

#include <xfc/gtk/label.hh>

#include <xfc/gtk/table.hh>


// Notebook


Notebook::Notebook()

{

    set_tab_pos(Gtk::POS_TOP);

    show();

}


Notebook::~Notebook()

{

}


void

Notebook::on_rotate_book()

{

    // This function
rotates
the position of the tabs


set_tab_pos((Gtk::PositionType)((gtk_notebook()->tab_pos + 1) % 4));

}


void

Notebook::on_tabsborder_book()

{

    // Add/Remove the
page
tabs and the borders

    int
tval
= false;

    int bval = false;


    if (!get_show_tabs())

        tval = true;

    if (!get_show_border())

        bval = true;


    set_show_tabs(tval);

    set_show_border(bval);

}


void

Notebook::on_remove_book()

{

    // Remove a page
from
the notebook

    int
page
=
get_current_page();

    remove_page(page);


    // Need to refresh
the
widget -- This forces the widget to redraw itself.

    queue_draw();

}


// NotebookWindow


NotebookWindow::NotebookWindow()

{

    set_border_width(10);


    Gtk::Table *table = new
Gtk::Table(3, 6);

    add(*table);


    // Create a new
notebook, place the position of the tabs

    Notebook *notebook = new Notebook;

    table->attach(*notebook, 0, 6, 0, 1);


    // Let's append a
bunch
of pages to the notebook

    Gtk::Label *label;

    for (int i = 0; i < 5; i++)

    {

        String s1 =
String::format("Append Frame %d", i +
1);

        String s2
= String::format("Page %d", i + 1);


        Gtk::Frame *frame = new
Gtk::Frame(s1);

        frame->set_border_width(10);

        frame->set_size_request(100,
75);


        label = new
Gtk::Label(s1);

        frame->add(*label);


        label = new
Gtk::Label(s2);

        notebook->append_page(*frame,
label);

    }


    // Now let's add a page to a specific spot

    Gtk::CheckButton *checkbutton = new
Gtk::CheckButton("Check me please!");

    checkbutton->set_size_request(100, 75);


    label = new
Gtk::Label("Add page");

    notebook->insert_page(*checkbutton, 2, label);


    // Now finally
let's
prepend pages to the notebook

    for
(int i = 0; i < 5; i++)

    {

        String s1 =
String::format("Prepend Frame %d", i +
1);

        String s2 = String::format("PPage
%d", i + 1);


        Gtk::Frame *frame = new
Gtk::Frame(s1);

        frame->set_border_width(10);

        frame->set_size_request(100,
75);


        label = new
Gtk::Label(s1);

        frame->add(*label);


        label = new
Gtk::Label(s2);

        notebook->prepend_page(*frame,
label);

    }


    // Set what page
to
start at (page 4)

    notebook->set_current_page(3);


    // Create a bunch
of
buttons

    Gtk::Button *button = new Gtk::Button("close");


button->signal_clicked().connect(sigc::mem_fun(this,
&NotebookWindow::dispose));

    table->attach(*button, 0, 1, 1, 2);


    button = new
Gtk::Button("next page");


button->signal_clicked().connect(sigc::mem_fun(notebook,
&Notebook::next_page));

    table->attach(*button, 1, 2, 1, 2);


    button = new
Gtk::Button("prev page");


button->signal_clicked().connect(sigc::mem_fun(notebook,
&Notebook::prev_page));

    table->attach(*button, 2, 3, 1, 2);


    button = new
Gtk::Button("tab position");


button->signal_clicked().connect(sigc::mem_fun(notebook,
&Notebook::on_rotate_book));

    table->attach(*button, 3, 4, 1, 2);


    button = new
Gtk::Button("tabs/border on/off");


button->signal_clicked().connect(sigc::mem_fun(notebook,
&Notebook::on_tabsborder_book));

    table->attach(*button, 4, 5, 1, 2);


    button = new
Gtk::Button("remove page");


button->signal_clicked().connect(sigc::mem_fun(notebook,
&Notebook::on_remove_book));

    table->attach(*button, 5, 6, 1, 2);


    table->show_all();

}


NotebookWindow::~NotebookWindow()

{

}


int main (int
argc, char *argv[])

{

    using namespace Main;


    init(&argc, &argv);


    NotebookWindow window;


window.signal_destroy().connect(sigc::ptr_fun(&Xfc::Main::quit));

    window.show();


    run();

    return 0;

}
Compiling Notebook
If you compiled and installed XFC yourself, you will find the source
code for Notebook in the
<examples/notebook> source directory along with a Makefile. If
XFC came pre-installed, or you installed it from an RPM package, you
will
find the source code in the
</usr/share/doc/xfcui-X.X/examples/notebook> subdirectory. In
this case you will have to create the Makefile yourself (replace X.X
with the
version number of the libXFCui library you have installed).To create a Makefile for Notebook, add the following lines to a new text file and save it using the name "Makefile":
CC = g++


CFLAGS = -Wall -O2


notebook: notebook.cc notebook.hh

    $(CC) notebook.cc -o notebook $(CFLAGS) `pkg-config
xfcui-X.X --cflags --libs`


clean:

    rm -f *.o notebook
If you cut and paste these lines make sure the whitespace before $(CC) and rm is a tab character. When you compile and run this program you will see the following window appear:
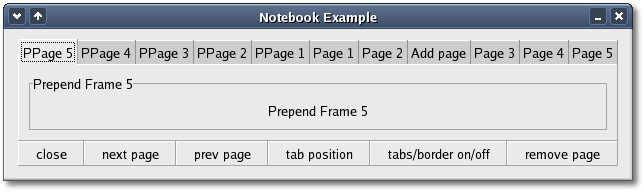
Clicking on a button in the window will set the corresponding notebook property and update the notebook accordingly.
| Copyright © 2004-2005 The XFC Development Team | Top |
XFC
4.4 |