The TextView Widget
GTK+ has an extremely powerful framework for multi-line text editing. The primary objects involved in the process are TextBuffer, which represents the text being edited, and TextView, a widget which can display a TextBuffer. Each buffer can be displayed by any number of views.
One of the important things to remember about text in GTK+ is that it's in the UTF-8 encoding. This means that one character can be encoded as multiple bytes. Character counts are usually referred to as offsets, while byte counts are called indexes. If you confuse these two, things will work fine with ASCII, but as soon as your buffer contains multi-byte characters, bad things will happen.
You can create a TextView widget using the following constructors:
TextView();


TextView(Gtk::TextBuffer& buffer);
The first constructor creates a text view widget with an empty default buffer. The second constructor creates a text view widget initialized with the specified 'buffer'.
You can set and/or retrieve the text buffer using these TextView methods:
void
set_buffer(Gtk::TextBuffer
*buffer);


Gtk::TextBuffer* get_buffer() const;
Text in a buffer can be marked with tags. A tag is an attribute that can be applied to some range of text. Tags can have names, which is convenient sometimes (for example, you can name your tag that makes text bold "bold"), but they can also be anonymous (which is convenient if you're creating tags on-the-fly). Tags don't have to affect appearance. They can instead affect the behavior of mouse and key presses, 'lock' a range of text so the user can't edit it, or countless other things. A tag is represented by a TextTag object. One TextTag can be applied to any number of text ranges in any number of buffers.
Each tag is stored in a TextTagTable. A tag table defines a set of tags that can be used together. Each buffer has one tag table associated with it; only tags from that tag table can be used with the buffer. A useful optimization is to create a TextTagTable in advance, and reuse the same tag table for all the buffers with the same tag set, instead of creating new copies of the same tags for every buffer. Tags are assigned default priorities in order of addition to the tag table. That is, tags created later that affect the same text property affected by an earlier tag will override the earlier tag.
You can create a new tag with one of these constructors:
TextTag();


TextTag(const
String&
name);
The first constructor creates an anonymous tag and the second constructor creates a tag with the specified name. Anonymous tags are convenient if you are creating tags on-the-fly, otherwise tags should have a name. After creating a tag you need to add it to the buffer's tag table before you can apply it to any text in the buffer.
The following TextBuffer method returns a buffer's tag table:
Gtk::TextTagTable*
get_tag_table() const;
To create a "Bold" tag and add it to a text buffer's tag table, you would do something like this:
Gtk::TextTag
*tag = new
Gtk::TextTag("Bold");

tag->property_weight().set(Pango::WEIGHT_BOLD);

text_buffer->get_tag_table()->add(*tag);
In the second line the tag's 'weight' property is set to Pango::WEIGHT_BOLD. This is how you manipulate text tags, through properties not getter and setter functions. There are 62 properties that can be set on a text tag.
There is an easier way to create and add a text tag to a text buffer; call one of the TextBuffer create methods which creates a new tag and adds it to its tag table:
Gtk::TextTag*
create_tag();


Gtk::TextTag* create_tag(const
String& tag_name);
Like the TextTag constructors, the first create_tag() method creates an anonymous tag and the second creates a tag with the specified name. Note, the returned tag is owned by the buffer's tag table, so the reference count will be equal to one.
Now we can simplify creating a "Bold" tag and adding it to a buffer's tag table:
Gtk::TextTag
*tag = text_buffer->create_tag("Bold");

tag->property_weight().set(Pango::WEIGHT_BOLD);
Most text manipulation is accomplished with iterators, represented by a TextIter object. An iterator represents a position between two characters in a text buffer. TextIter is a class designed to be allocated on the stack; it's guaranteed to be copyable by value and never contain any heap-allocated data. Iterators are not valid indefinitely; whenever the buffer is modified in a way that affects the number of characters in the buffer, all outstanding iterators become invalid. (Note that deleting 5 characters and then reinserting 5 still invalidates iterators, though you end up with the same number of characters you pass through a state with a different number).
After adding a tag to a buffer's tag table you can apply the tag to some range of text in the buffer. This can be done by calling one of the TextBuffer apply methods, or by calling one of the insert methods which will apply the tag to the text the method inserts.
Here is one of the TextBuffer apply methods:
void
apply_tag(Gtk::TextTag& tag, const
TextIter& start, const
TextIter& end);
The 'tag' argument is the tag (that must be in the buffer's tag table) whose properties should be applied to the text in the range 'start' to 'end'.
Here is one of the TextBuffer insert methods:
void
insert_with_tag(Gtk::TextIter& iter, const
String& text,
Gtk::TextTag& tag);
The 'iter' argument is an iterator to a position in the buffer, 'text' is the text string to insert at this position and 'tag' is the text tag to apply to the text. There are other insert methods that can insert text without specifying a tag, insert text at the current cursor position or insert pixbufs. You should have a look at the TextBuffer and TextTag API reference. The functions are all well documentated.
Iterators can't be used to preserve positions across buffer modifications. To preserve a position you need to use a TextMark object. You can think of a mark as an invisible cursor or insertion point; it floats in the buffer, saving a position. If the text surrounding the mark is deleted, the mark remains in the position the text once occupied; if text is inserted at the mark, the mark ends up either to the left or to the right of the new text, depending on its gravity. The standard text cursor in left-to-right languages is a mark with right gravity, because it stays to the right of inserted text.
Like tags, marks can be either named or anonymous. There are two marks built-in to TextBuffer; these are named "insert" and "selection_bound" and refer to the insertion point and the boundary of the selection which is not the insertion point, respectively. If no text is selected, these two marks will be in the same position. You can manipulate what is selected and where the cursor appears by moving these marks around.
Unlike tags, you can't construct a mark. The only way to create a mark is the call the TextBuffer create_mark() method:
Gtk::TextMark*
create_mark(const
String& mark_name, const
TextIter& where, bool
left_gravity);
The 'mark_name' argument is the name for the mark, 'where' is the position in the buffer to place the mark, and 'left_gravity' specifies whether the mark should have left or right gravity. If mark_name is null, the mark is anonymous. If a mark has left gravity, and text is inserted at the mark's current location, the mark will be moved to the left of the newly-inserted text. If the mark has right gravity (left_gravity = false), the mark will end up on the right of newly-inserted text. The standard left-to-right cursor is a mark with right gravity (when you type, the cursor stays on the right side of the text you're typing). The caller of this method does not own a reference to the returned TextMark, so you can ignore the return value if you like. Marks are owned by the buffer and go away when the buffer does.
An anchor is a spot in a TextBuffer where child widgets can be anchored, inserted inline, as if they were characters. An anchor, represented by TextChildAnchor, can have multiple widgets anchored, to allow for multiple views.
The easiest way to create an anchor it to call the TextBuffer create_child_anchor() method:
Gtk::TextChildAnchor*
create_child_anchor(Gtk::TextIter& iter);
The 'iter' argument is the position in the buffer to place the anchor. The new anchor is owned by the buffer so no reference count is returned to the caller. Have a look at the TextView demo program in <demos/xfc-demo/textview.cc>. It displays a text buffer that has several widgets anchored.
The one thing not covered yet is creating a text buffer. That's easy, but as you saw at the start, if you don't specify a text buffer when you create a TextView widget, the widget creates an default buffer for you.
You can create a text buffer by calling the following constructor:
TextBuffer(Gtk::TextTagTable
*table = 0);
You could create your own buffer when you want to reuse one TexTagTable, or when you want to display one buffer in multiple text views. Text buffers always contain at least one line, but may be empty (that is, buffers can contain zero characters). The last line in the text buffer never ends in a line separator (such as newline); the other lines in the buffer always end in a line separator. Line separators count as characters when computing character counts and character offsets. Note that some Unicode line separators are represented with multiple bytes in UTF-8, and the two-character sequence "\r\n" is also considered a line separator.
One TextBuffer method worth mentioning is place_cursor():
void
place_cursor(const
TextIter& where);
This method lets you place the cursor in response to a user action, moving both "insert" and "selection_bound" marks simultaneously without causing a temporary selection (moving one mark then the other temporarily selects the range in between the old and new positions). The 'where' argument is the position in the buffer to place the cursor.
TextView Example
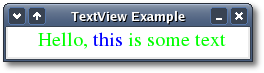
There are two ways to affect text attributes in a TextView. You can change the default attributes for a given TextView widget, or you can apply tags that change the attributes for a region of text. For text features that come from the theme - such as font and foreground color - use standard Gtk::Widget methods such as modify_font() or modify_text(). For other attributes, there are dedicated methods on TextView such as set_tabs(); Here is a simple example that changes a text view's default font, text color and left margin, and sets the text color for a region of text to blue.The header file for this TextView example is <textview.hh>
#include <xfc/main.hh>

#include <xfc/gtk/window.hh>


using
namespace
Xfc;


class
TextViewWindow
: public
Gtk::Window

{

public:

    TextViewWindow();

    virtual
~TextViewWindow();

};
and the source file is textview.cc
#include "textview.hh"

#include <xfc/gtk/textview.hh>

#include <xfc/gdk/color.hh>


TextViewWindow::TextViewWindow()

{

    set_title("TextView Example");


//
Create
text view widget

    Gtk::TextView *view = new
Gtk::TextView;

    add(*view);


//
Get a
pointer to the default buffer

    Gtk::TextBuffer *buffer =
view->get_buffer ();

    buffer->set_text ("Hello, this is
some text");


//
Change
default font throughout the widget


Pointer<Pango::FontDescription> font_desc = new
Pango::FontDescription("Serif
15");

    view->modify_font(*font_desc);


//
Change
default color throughout the widget

    Gdk::Color color("green");


view->modify_text(Gtk::STATE_NORMAL, color);


// Change left
margin throughout the widget

    view->set_left_margin(30);


//
Use a
tag to change the color for just one part of the widget

    Gtk::TextTag *tag =
buffer->create_tag("blue_foreground");

    tag->property_foreground() =
String("blue");

    Gtk::TextIter start =
buffer->get_iter_at_offset(7);

    Gtk::TextIter end =
buffer->get_iter_at_offset(12);

    buffer->apply_tag(*tag, start,
end);


    view->show();

}


TextViewWindow::~TextViewWindow()

{

}


int
main (int
argc, char
*argv[])

{

    using
namespace
Main;


    init(&argc, &argv);


    TextViewWindow window;


window.signal_destroy().connect(sigc::ptr_fun(&Xfc::Main::quit));

    window.show();


    run();

    return
0;

}
Compiling TextView
If you compiled and installed XFC yourself, you will find the source
code for TextView in the
<examples/textview> source directory along with a Makefile. If
XFC came pre-installed, or you installed it from an RPM package, you
will
find the source code in the
</usr/share/doc/xfcui-X.X/examples/textview> subdirectory. In
this case you will have to create the Makefile yourself (replace X.X
with the
version number of the libXFCui library you have installed).To create a Makefile for TextView, add the following lines to a new text file and save it using the name "Makefile":
CC = g++


CFLAGS = -Wall -O2


textview: textview.cc textview.hh

    $(CC) textview.cc -o textview $(CFLAGS) `pkg-config
xfcui-X.X --cflags --libs`


clean:

    rm -f *.o textview
If you cut and paste these lines make sure the whitespace before $(CC) and rm is a tab character. When you compile and run this program you will see the following window appear:
You will find a much more complex text view widget implemented in the TextView demo program in <demos/xfc-demo/textview.cc>.
| Copyright © 2004-2005 The XFC Development Team | Top |
XFC
4.4 |