Menus
There are two ways to create menus in GTK+. You can use the User Interface Manager which constructs menu and toolbar widgets from an XML description, or you can use a Gtk::MenuShell and create the menus manually. It is a lot easier to use the user interface manager (Gtk::UIManager) because it takes care of constructing both menus and toolbars from one set of UI definitions. There will be times though when you will want to create menus manually.
Gtk::MenuShell is the abstract base class used to derive Gtk::MenuBar and Gtk::Menu. A MenuShell is a container of menu item objects arranged in a list which can be navigated, selected, and activated by the user to perform application functions. A menu item can have a submenu associated with it, allowing for nested hierarchical menus.
MenuBar is a subclass of MenuShell which contains one or more menu item. The result is a standard menu bar which can hold many menu items. Menu is a MenuShell that implements a drop down menu consisting of a list of menu item objects which can be navigated and activated by the user to perform application functions. A Menu is most commonly dropped down by activating a menu item in a MenuBar or popped up by activating a menu item in another Menu. Widgets such as Gtk::Entry, Gtk::Notebook and Gtk::TextView can also pop up a Menu, but these are context menus that contain menu items specific to the widget.
There are three widgets that go
into making a
menubar with submenus:
- a menu item - which is what the user wants to select, e.g., 'Save'
- a menu - which acts as a container for the menu items, and
- a menubar - which is a container for each of the individual menus.
Let's look at the constructors that are used to create menubars and menus. This first constructor is used to create a new menubar:
MenuBar();There are two constructors that create a new menu:
 Menu();


Menu(const AccelGroup&
accel_group);
The 'accel_group' argument is the
accelerator group which holds the global accelerators for this menu.
The
first constructor creates the accelerator group for you which can be
retrieved by calling:
Gtk::AccelGroup*
get_accel_group() const;
The next three constructors are used to create menu items that are packed into menubars and menus:
MenuItem();


MenuItem(const String& label, bool
use_underline = false);


MenuItem(const String& label,
Gtk::Menu& submenu, bool
use_underline
= false);
The 'label' argument is the menu item text, 'submenu' is a menu to associate with the menu item and 'use_underline', if true, specifies that label should be parsed for the mnemonic character. The first constructor creates an empty menu item, the second constructor creates a menu item with a label already packed into it and the last constructor creates a menu item that displays another menu when activated.
There are other more specialized menu items which can be used to construct menus. ImageMenuItem displays an image next to the text string. CheckMenuitem displays a checkbutton that can be in an active or inactive state. RadioMenuItem displays a radiobutton as part of a group which only allows one active menu item at a time. SeparatorMenuItem displays a separator line in the menu and TearoffMenuItem allows its menu to be torn off and displayed in a separate window.
Once you have created a menu item you have to put it into a menu. This is done using one of the Gtk::MenuShell methods: append, prepend or insert. There are several indentical overloaded methods for each. These are the append methods:
void append(MenuItem& item);


void
append(MenuItem& item, const
sigc::slot<void>& callback);


void
append(MenuItem& item, const
AccelKey& accel_key, const
sigc::slot<void>& callback);


void
append(MenuItem& item, const
AccelKey& accel_key, AccelGroup& accel_group, const
sigc::slot<void>& callback);


void append(const StockId& stock_id, const
sigc::slot<void>& callback);


void
append_separator();
The 'item' argument is the menu item to add, 'callback' is the slot function to be called if the menu item is activated, 'accel_key' is the accelerator key for the menu item, 'accel_group' is the accelerator group to add the accelerator key to, and 'stock_id' is the identifier of the stock menu item to add. The last method, append_separator(), is a convenience method that creates and appends a separator for you.
In order to capture when a menu item is selected by the user, you need to connect a callback slot to the item's 'activate' signal. If you use the first append method you will have to make this connection yourself. If you pass a valid slot to one of the other append methods, append() will make this connection for you.
For example, if you wanted to create a standard File menu, with the options File, Save, and Quit, the code would look like this:
Gtk::Menu
*file_menu = new Gtk::Menu;


// Create menu items

Gtk::MenuItem *item = new
Gtk::Menu("Open");

file_menu->append(*item, sigc::mem_fun(this,
&MyWindow::on_file_open));


item = new Gtk::Menu("Save");

file_menu->append(*item, sigc::mem_fun(this,
&MyWindow::on_file_save));


item = new Gtk::Menu("Quit");

file_menu->append(*item, sigc::mem_fun(this,
&MyWindow::on_file_quit));


// Show all the menu items

file_menu->show_all();
At this point you have a menu. Now
you need
to
create a menubar and a menu item for the File menu. The code looks like
this:
Gtk::MenuBar
*menubar = new Gtk::MenuBar

window->add(*menubar);


Gtk::MenuItem *file_item = new
Gtk::MenuItem("File", *file_menu);

menubar->append(*file_item);


file_item->show();

menubar->show();
If you wanted the menu right
justified on
the
menubar, such as help menus often are, you would use the following
Gtk::MenuItem method on the menu item before attaching it to the
menubar.
void
set_right_justified(bool right_justified);
Here is a summary of the steps needed to create a menu bar with menus attached:
- Construct a new menu.
- Construct multiple menu items and use Gtk::MenuShell::append() to add each of these new items to the menu.
- Construct a menu item that will be the root of the menu, the text appearing here will be on the menubar itself.
- Pass a reference to the menu, to the root menu item constructor (the one created in the above step).
- Construct a new menubar. This step only needs to be done once when creating a series of menus on one menu bar.
- Use Gtk::MenuShell::append() to put the root menu onto the menubar.
void popup(unsigned int button, unsigned
int activate_time =
GDK_CURRENT_TIME);
The 'button' argument is the button which was pressed to initiate the event and 'activate_time' is the time at which the event occurred. This method positions the popup menu at the current pointer position. There are two other popup() methods with extended options that give you more control over where the popup menu will appear.
You can create a popup menu by explicitly calling popup() from a 'button_press_event' signal handler, which has the following prototype:
bool
MyWindow::event_handler(const
Gdk::EventButton& event);
For example, to connect to a
'button_press_event'
and use its event argument to find out where to pop up the menu, take
these steps. Connect to a slot with the following extended prototype:
bool
MyClass::event_handler(const
Gdk::EventButton& event, Gtk::Menu *menu);
Use sigc::bind() to bind a pointer to the menu, to your slot:
sigc::bind(sigc::mem_fun(this,
&MyWindow::event_handler), menu);
where 'menu' is the bound menu pointer. Remember that bound data is always passed as the last argument to the bound method, unless otherwise specified. This would pass the bound data as the first argument:
sigc::bind<0>(sigc::mem_fun(this,
&MyWindow::event_handler), menu);
in which case your slot would have this extended prototype:
bool
MyClass::event_handler(Gtk::Menu
*menu, const
Gdk::EventButton& event);
Using the first prototype, if the event is a mouse button press, treat the event as a button event (which it is) and use it as shown in the following code to pass information to Gtk::Menu::popup():
bool

MyClass::event_handler(const
Gdk::EventButton& event, Gtk::Menu *menu)

{

    menu->popup(event.button(), event.time());


    // return true to
indicate event has been handled

    return true;

}
Menu Example
Let's take a look at a menu example that implements all of the above features. The header file for this example is <menu.hh>:#include <xfci/main.hh>
#include <xfc/gtk/menu.hh>
#include <xfc/gtk/window.hh>
using namespace Xfc;
class MenuWindow : public Gtk::Window
{
MenuWindow(const
MenuWindow&);
MenuWindow& operator=(const
MenuWindow&);
protected:
bool
on_button_press(const
Gdk::EventButton& event, Gtk::Menu *menu);
public:
MenuWindow();
virtual ~MenuWindow();
void
menu_item_selected(const char *parent, const
char *item);
void on_file_new();
void on_file_open();
void on_file_save();
void on_file_save_as();
void on_file_quit();
void
on_options_preferences();
void on_help_about();
};and the source file is <menu.cc>:
#include "menu.hh"

#include <xfc/gtk/accelgroup.hh>

#include <xfc/gtk/box.hh>

#include <xfc/gtk/eventbox.hh>

#include <xfc/gtk/label.hh>

#include <xfc/gtk/menubar.hh>

#include <xfc/gtk/menuitem.hh>


MenuWindow::MenuWindow()

{

    set_title("Menu Window");

    set_size_request(300, 200);


    // Boxes don't
receive
button events so use an eventbox. The eventbox is added first

    // and then all the other widgets added to it.

    Gtk::EventBox *eventbox = new
Gtk::EventBox;

    add(*eventbox);


    // Set the events
the
eventbox is to receive. These can be any number of or'd (|) values

    // from the Gdk::EventMask enumeration.


eventbox->set_events(Gdk::BUTTON_PRESS_MASK);


    // Add the packing box to
eventbox

    Gtk::VBox *vbox = new
Gtk::VBox(false, 1);

    vbox->set_border_width(1);

    eventbox->add(*vbox);


    // Create the
menubar.
Menus can be created by using the append, prepend or insert methods

    // in menushell.hh to add menu items.

    Gtk::MenuBar *menubar = new Gtk::MenuBar;

    Gtk::AccelGroup *accel_group = add_accel_group();


    // Create the File
menu

    Gtk::Menu *menu = new
Gtk::Menu(*accel_group);

    menu->append(*(new
Gtk::MenuItem("_New", true)),
"<control>N", slot(this,
&MenuWindow::on_file_new));

    menu->append(*(new
Gtk::MenuItem("_Open", true)),
"<control>O", slot(this,
&MenuWindow::on_file_open));

    menu->append(*(new
Gtk::MenuItem("_Save", true)),
"<control>S", slot(this,
&MenuWindow::on_file_save));

    menu->append(*(new
Gtk::MenuItem("Save _As", true)), slot(this,
&MenuWindow::on_file_save_as));

    menu->append_separator();

    menu->append(*(new
Gtk::MenuItem("_Quit", true)),
"<control>Q", slot(this, &MenuWindow::on_file_quit));

    menubar->append(*(new
Gtk::MenuItem("_File", *menu, true)));


    // Bind the file
menu to
the button_press event and use it as the popup menu.


eventbox->signal_button_press_event().connect(sigc::bind(sigc::mem_fun(this,
&MenuWindow::on_button_press), menu));


    // Create Options
menu

    menu = new
Gtk::Menu;

    menu->append(*(new
Gtk::MenuItem("_Preferences", true)),
slot(this,
&MenuWindow::on_options_preferences));

    menubar->append(*(new Gtk::MenuItem("_Options",
*menu, true)));


    // Create Help menu

    menu = new
Gtk::Menu;

    menu->append(*(new
Gtk::MenuItem("About")), slot(this,
&MenuWindow::on_help_about));

    Gtk::MenuItem *menu_item = new
Gtk::MenuItem("_Help", *menu, true);

    menu_item->set_right_justified(true);

    menubar->append(*menu_item);


    // Pack the
menubar into
the vbox

    vbox->pack_start(*menubar, false);


    // Add a label that tells the
user to click the mouse button inside the client area.

    Gtk::Label *label = new Gtk::Label("Click mouse
button here...");

    vbox->pack_start(*label);


    // Being lazy,
just show
everything with one call.

    show_all();

}


MenuWindow::~MenuWindow()

{

}


bool

MenuWindow::on_button_press(GdkEventButton *event, Gtk::Menu *menu)

{

    menu->popup(event->button, event->time);

    return true;

}


void

MenuWindow::menu_item_selected(const char
*parent, const char *item)

{

    g_message("Menu: activated the \"%s\" menu item:
\"%s\"", parent, item);

}


void

MenuWindow::on_file_new()

{

    menu_item_selected("File", "New");

}


void

MenuWindow::on_file_open()

{

    menu_item_selected("File", "Open");

}


void

MenuWindow::on_file_save()

{

    menu_item_selected("File", "Save");

}


void

MenuWindow::on_file_save_as()

{

    menu_item_selected("File", "Save As");

}


void

MenuWindow::on_file_quit()

{

    dispose();

}


void

MenuWindow::on_options_preferences()

{

    menu_item_selected("Options", "Preferences");

}


void

MenuWindow::on_help_about()

{

    menu_item_selected("Help", "About");

}


XFC_MAIN(MenuWindow)
Compiling Menu
If you compiled and installed XFC yourself, you will find the source
code for Menu in the
<examples/menu> source directory along with a Makefile. If
XFC came pre-installed, or you installed it from an RPM package, you
will
find the source code in the
</usr/share/doc/xfcui-X.X/examples/menu> subdirectory. In
this case you will have to create the Makefile yourself (replace X.X
with the
version number of the libXFCui library you have installed).To create a Makefile for Menu, add the following lines to a new text file and save it using the name "Makefile":
CC = g++


CFLAGS = -Wall -O2


menu: menu.cc menu.hh

    $(CC) menu.cc -o menu $(CFLAGS) `pkg-config
xfcui-X.X --cflags --libs`


clean:

    rm -f *.o menu
If you cut and paste these lines make sure the whitespace before $(CC) and rm is a tab character. When you compile and run this program you will see the following window appear:
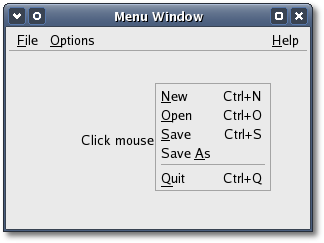
The window displays a menubar across the top
that contains three menu items: File, Options and Help.
When
you click a mouse button down anywhere inside its client area the
menubar's File menu pops up at the current pointer position.
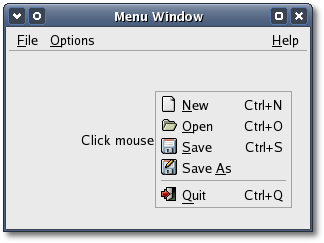
Stock Menu Example
There is a second menu example in the <examples/menu> subdirectory that creates the same window as above but instead uses stock menu items and their icons. Except for the menu creation code in the MenuWindow constructor the source code in <stock.cc> is the same: // Create the menubar. Menus can be
created by using the append, prepend or insert methods
// in menushell.hh to
add menu items.
Gtk::MenuBar *menubar = new
Gtk::MenuBar;
Gtk::AccelGroup *accel_group = add_accel_group();
// Create the File menu
Gtk::Menu *menu = new
Gtk::Menu(*accel_group);
menu->append(Gtk::StockId::NEW, sigc::mem_fun(this,
&MenuWindow::on_file_new));
menu->append(Gtk::StockId::OPEN, sigc::mem_fun(this,
&MenuWindow::on_file_open));
menu->append(Gtk::StockId::SAVE, sigc::mem_fun(this,
&MenuWindow::on_file_save));
menu->append(Gtk::StockId::SAVE_AS, sigc::mem_fun(this,
&MenuWindow::on_file_save_as));
menu->append_separator();
menu->append(Gtk::StockId::QUIT,
sigc::mem_fun(this,
&MenuWindow::on_file_quit));
menubar->append(*(new
Gtk::MenuItem("_File", *menu, true)));
// Bind the file menu
to the button_press event and use it as the popup menu.
eventbox->signal_button_press_event().connect(sigc::bind(sigc::mem_fun(this,
&MenuWindow::on_button_press), menu));
// Create Options menu
menu = new
Gtk::Menu(*accel_group);
menu->append(Gtk::StockId::PREFERENCES, sigc::mem_fun(this,
&MenuWindow::on_options_preferences));
menubar->append(*(new
Gtk::MenuItem("_Options", *menu, true)));
// Create Help menu
menu = new Gtk::Menu;
Gtk::MenuItem *menu_item = new
Gtk::ImageMenuItem(*(new Gtk::Image(Gtk::StockId::DIALOG_INFO,
Gtk::ICON_SIZE_MENU)), "_About", true);
menu->append(*menu_item, sigc::mem_fun(this,
&MenuWindow::on_help_about));
menu_item = new
Gtk::MenuItem("_Help", *menu, true);
menu_item->set_right_justified(true);
menubar->append(*menu_item);Compiling Stock
To create a Makefile for Stock, add the following lines to a new
text
file
and save it using the name "Makefile":CC = g++
CFLAGS = -Wall -O2
stock: stock.cc menu.hh
$(CC) stock.cc -o stock $(CFLAGS) `pkg-config
xfcui-X.X --cflags --libs`
clean:
rm -f *.o stockIf you cut and paste these lines make sure the whitespace before $(CC) and rm is a tab character. When you compile and run the Stock program you will see the following window appear:
The XFC_MAIN macro is a convenience macro that writes a simple main function, its only argument is the name of the main window class. The macro is defined in <xfc/main.hh> as:
#define XFC_MAIN(MainWidget)\

    int main (int argc, char *argv[])\

    {\

        Xfc::Main::init(&argc,
&argv);\

        MainWidget main_widget;\


main_widget.signal_destroy().connect(sigc::ptr_fun(&Xfc::Main::quit));\

        main_widget.show();\

        Xfc::Main::run();\

        return 0;\

    }
Most main functions in C++ are simple because all the creation work for the main window is done inside its constructor, not the main function.
| Copyright © 2004-2005 The XFC Development Team | Top |
XFC
4.4 |